
Section 6: Fur and Foam
You have made it to the final step of your journey in making your own Protogen helmet, the furring and foam adding to your helmet. Whether you have some sewing experience or none at all do not worry as sewing is not as scary as it might seem. This section will go over how FurBitten Studios does the furring. You are more than welcome to use alternate methods or skip parts, like shaving for example, if you wish.
Tools List
Heavy Duty Sewing Machine + Titanium Needle
Scissors
Hot Glue Gun
Straight Hand Sewing Needle
Curved Hand Sewing Needle
Fabric marker/Chalk
Slicker brush
Pet hair Shaver
Mannequin Bust
Markers (multiple colors)
Sewing clips/pins
Material List
Hot Glue Sticks (Gorilla Brand recommended)
Thread (color of your choice)
Fur(s)
Fleece
Liner Material
Upholstery Foam (1/2in or 1in)
Duct Tape
Cling Plastic Wrap
Faux Fur Recommend sources
Note: While a sewing machine will help speed things along it is not required when making a fursuit. You can entirely hand sew a fursuit if you're on a budget and do not mind the extra time needed to hand sew all parts of a piece(s).
Additional tutorials may come down the line to cover other items like a hair piece, paws, tail, etc. At this time this tutorial will only cover a general protogen helmet furring.
Inner Foam
Step 1:
Before we place the helmet on your mannequin bust we need to make the inside nice and comfortable. If you have a head 23in or above I recommend using 1/2in upholstery foam. If you have a head that is small then 23in then you may want to use 1in foam. However this may be too snug. If you are wanting a more roomy helmet then 1/2in foam is the way to go.
Line the inside of your helmet with your chosen foam size using your hot glue gun to secure the pieces in place. You do not need to cover the entire inside, you may just do patches of foam if you would like. A liner is also not required. If you would like to do a liner then you will need to cover the inside, with the foam, in tape and carefully remove it to transfer it to your liner material. This can be tedious or difficult with a round surface like this.
Liner material should be breathable sportswear fabric.
Wearing a clean balaclava regular is more than enough if you do not wish to line the side.

Note: Using your roll of duct tape as a stand helps greatly when working on the inside of the helmet. This will keep your helmet tipped up and not roll around as you work.
Step 2:
It is time to place your helmet on your mannequin bust and grab your duct tape and cling plastic wrap. If you have not yet attached your ears to the helmet I will address working them into the pattern in Step 6.
Note: I do recommend NOT having the electronics in the helmet during the furring stage to make working the helmet much easier in later steps. Having the visor set off to the side will help as well.

Patterning
Step 3:
Place a line of tap along the inner bottom edge of the jaw plate. This will help in holding the cling wrap.

Step 4:
You can now begin to wrap your helmet and bust with the cling wrap. Take the first piece and run it along the front making sure it grabs the duct tap we placed along the jaw plate. Take a second piece and run it from the top of the helmet down the back. If needed use a small piece of duct tape to hold the cling wrap on the top of the helmet.
If you already have ears on the helmet simply put the cling wrap in between them.
IMPORTANT: Unless you plan to put in a zipper (which will not be covered in this guide) DO NOT tightly wrap things. Note in the image below that the cling wrap is essentially going straight down or off of the helmet. This is to ensure your head can fit through the neck. It may seem a little thick and blocky but I ask you to trust the process.

Step 5:
With the cling wrap all in place you can now grab your duct tape and start to cover everything. When placing the duct tap on be sure to do so kinda gently so you do not push in on the cling wrap and we hold our shape.
If you already have your ears on you DO NOT need to tape them as we already made our flat patterns in Section 5. Just tape around the ears.
You will also only be taping HALF of the helmet. Patterns will be flipped. This saves time and materials. If your protogen is not symmetrical then taping the full helmet will need to be done.

Step 6:
If you have not marked your ears, it is now time to do so. Hold your ear in place and trace around it. After Step 10 we can slip the pattern to mark the other ear for perfect symmetry. After Step 10 you will then refer to Section 5 about how to attach your ears to the helmet.

Step 7:
With the rough taping done we can now draw our the bottom edge and mark our center line down the back of the helmet.
Note: The groove on the helmet backing is the center line.
On the front however we are not going to draw our line in the center. We want to go about a 1/4in in and mark that as our “center”. The reason for this will make sense in later steps but to put it shortly as we attach the fur to the helmet things are going to stretch just a little and the adjustment in the front will help prevent the front edge from being too long and bunched up.

Step 8:
Grab your other color markers and begin to draw in your pattern. First draw out the larger pieces, then draw in your smaller markings. Using different colors will help if using multiple fur colors but this is not required.
You will want to note the color and the fur direction of each piece. You may also add any additional markings that will help such as tick marks, numbers, etc. As long as you know where each piece goes and the direction then all is well.
Patterning ears explained in Section 5

Step 9:
We are about to start cutting off the pattern from the helmet. But before we do ensure you have a spot to layout your pieces as you cut them. First we will want to clean up our edges. Cut along your bottom edge and your center lines to remove all excess tape and cling wrap. You'll have this nice clean half pattern.

Step 10:
Start with the lower neck when cutting into the pattern following your larger piece(s) lines. As you remove pieces, place them aside in position from where you pulled them from. Not a required thing to do but it will keep things organized.
Once you have the lower neck out of the way, cut out the marked ear spot ( if applicable) and trace the hole to transfer that mark to the 3D print itself.
When you remove the upper piece be sure to flip it over and trace the opposite ear position before laying the template with your other pieces.
Note: At this time now that all of the pattern pieces have been removed please see Section 5 and glue on your ears. While the ears cure we will begin working with the fur.

Step 11:
With the larger pieces of the pattern cut you can now cut your smaller markings.
Note: Ensure that as you lay out your pieces they are as flat as possible. If needed, cut larger sections into small pieces or cut darts into the pattern.
“What is a dart?”
-
A dart is a partial cut into a large piece generally at a point where the pattern is curved a lot. This partial cut keeps it as one piece but allows it to lay flat. The triangular opening would be sewn closed to return the piece to its curved state.

Step 12:
OH BOY!!! It is now fur time. Start with the top helmet piece first. Grab your color(s) and prepare for pattern transfer. You will need your fabric marker, slicker brush and scissors for this step.
Lay out your fur and note the direction that that fur is flowing. You will then lay down your template on the fur and ensure your fur direction marker matches the fur direction.
Note: Do not place templates too close to the fabric edge as you will need to mark and/or cut seam allowance. Also remember we only patterned half of the helmet so you will need to flip your template in order to get both sides.

IMPORTANT
When you are cutting fur DO NOT chop at it. Doing so will cut the fibers. When cutting fur you want to slide the scissors along the backing of the fur. This will allow you to cut without leaving a choppy edge on the fur on the other side.
Bonus Tip!
To get an even seam allowance around your template you can tape to markers together. Trace once get two lines!

If you would like to cut all of your pieces now you may do so or you can cut pieces as needed while we sew things together. After you have cut a piece be sure to use your slicker blush to give the piece a quick brushing to remove any loose fur.
Furring
Preparing for sewing:
Whether you are using pins or clips it is important to make sure you tuck in the fur. This will help prevent your thread from getting knotted up in the fur as well as give you a clean look on the fur side after completing the seam. When it comes to clips and pins you do not need to go crazy with it but you can clip/pin as extensively as you would like. I personally find a clip/pin every 1-2in is optimal in holding the pieces in place.
At this time it would be beneficial for you to look up a video on how to do a blanket hand stitch if you do not know how to do one. Taking a moment with some scrap fur to practice on your sewing machine if needed before sewing your cut head pieces. For machine sewing a simple single straight stitch is all that will be needed.
Step 22 will require a different stitch; a ladder/hidden stitch. If you would like to look at a video about that stitch now you may. This is also noted in step 22 as a reminder.
Step 13:
As you cut pieces some additional trimming will be needed. For seams that are going to be machine sewn we need to leave that seam allowance we just drew. However for areas where we will need to hand sew we will not need that seem allowance as we control how the needle passes through the fabric. Hand sewn seams are also ideal for areas that are simply too difficult to machine sew, are too short, or need to be low profile.
It's important to think about how these pieces will come together and what method you'll be using to make the appropriate cuts in the correct spaces. For example, most markings are generally hand sewn while the large pieces are machine sewn together.
Note: There is one exception to this however. When it comes to the ears you do want seam allowance on the main outer edge. Even though we will be handsewing that seam we will be using a different type of stitch where the seam allowance will be needed.
Looking at the top helmet fur piece here I’ll explain my process.

Line colors and reasons:
Red line - These are larger simple connection points that will be easy to machine sew thus seam allowance remains
Purple line- Here we will be hand sewing as it's kinda an awkward angle(s) to machine sew when attaching the front and back ear.
Green Line- No sewing will be done here as these edges meet the primary helmet frame; no seam allowance here.
Step 14:
If you have cut all your pieces grab all your pieces for the front and back of both ears. Because we are going to shave the ears any markings will need to be hand sewn in. For hand sewing these we will be using a blanket stitch, simple strong stitch to do! For the blanket stitch your straight hand sewing needle will be used.
When doing your blanket stitch do not rush yourself if this is your first time doing any sort of hand sewing. You want to ensure your stitch is even and has a good bite on both fabrics.
Practice on scrap fur first if needed

Step 15:
At this time go through and start sewing away! You will want to make the front neck piece and the upper hood piece.
Do not sew the back center line of the lower neck piece just yet and do not attach the lower neck to the upper hood yet either.


Step 16:
With your 2 main hood pieces now to this point set aside the upper hood. Grab your fleece as we are now going to make a ribbon that runs along the front. This is so when we glue on the fur this fleece ribbon is going to grab much better than the fur. If you would like to sew on Velcro or other removable item you may do.
The ribbon can be a bit thick as once its glued in you can trim away any excess. The thicker ribbon will also give you something to grab when glue and putting it into place.
The Fleece ribbon can be machine sewn on even if you did not leave seam allowance. In this area it will not affect anything.
Once the fleece ribbon has been sewn on you may now sew the back center seam.

Shaving
Step 17(optional):
It is time to return to our ears. If you are planning to shave your ears then you will need your saver, slicker brush, and scissors. How you shave them is entirely up to you. I tend to leave a bit of fluff on the inner ear, and fade from the base of the ear upward to help with a smoother transition.
Note: It is heavily encouraged that you DO NOT use a normal hair shaver but instead a pet shaver. There are basic 20$ ones available on Amazon that shaves faux fur beautifully
Start with matching up your ear front and backs.

When saving your ears let the shaver do the work! You do not need to press hard or angle it up. Keep your shaver flat.

You will want to do at least 2 passes on the shaving with brushing in between. This will give you a smooth clean even shave!
Shave → Brush → Shave → Brush
If your ears have any sort of markings and you find that after the shave you have some “bleeding” between the two fur colors, you can clean these up with your scissors. Run your scissors along the seam to straighten up the line between the furs like so.

You now have nice shaved clean ears!
Step 18:
With your ears complete and shaved grab your top hood piece and carefully get each ear half in place. Take your time with this! It can be a little confusing. You can slip the upper hood on the helmet and then match up each ear side with the correct half of the helmet as well as the correct seam for the front and back pieces. Pin or clip in place and test fit again if needed. These will need to be handsewn so there is no such thing as over checking before you start sewing.
The ears will be connected to the hood at the base only using a blanket stitch. Do not sew up the outer edge of the ear yet.

Step 19:
With the ears sewn to the upper hood now you can sewn together the upper hood to the lower neck piece.

Step 20:
Before we start to attach the hood to the helmet lets make a quick simple battery pocket out of fleece. You may sew in or just glue on the pocket to the lower neck piece in the back. Having your battery in the back of the lower neck will help act as a counter weight to the electronics in the front of the helmet.

Step 21:
Almost all the sewing is now done and we can start to attach our hood to our helmet. Heat up that hot glue gun! For attaching we want to work in this order:
1. Roll or lift the top hood as much as you can and begin glueing the center. Working your way from the middle of the ears towards the front of the helmet
2. Glue up the back of the ears ensuring they stay as centered as possible
3. Glue up the front of the ears. I recommend doing this part in sections to ensure you can really push the fabric back into place

4. Work your way around the overband glueing down everything in the font
5. Now that the top is all glued down remove your helmet from the mannequin (it will be easier for the lower section)
6. Start with the center jaw gluing up about 3in of the front. This will hold the center of the neck in place as we work down the left and right sides
7. Work down one side putting glue on the fleece ribbon just above the fur to the jaw plate and inner side of the cheek hubs
8. Repeat step 7 for the opposite side
9. Check around all the edges to ensure everything is glued down into place
10. Trim away any extra ribbon material and place back on your mannequin

Step 22:
With our hood now secure in place it's time to sew the final two seams on the ears. Here we will need our curved sewing needle as it will make working around the ears, particularly at the base of the ears, easier to do. To close the ears without seeing any thread or fabric edges we are doing to do a ladder/hidden stitch. Like the blanket stitch you want to take your time and do small even stitches around the ear.
Please take a moment to look at a video on how to do this stitch if you are not familiar with it. Practice on scrap fur first if it's your first time. With all the fur glued down fixing a mistake can be done but will not be easy.
Step 23:
The fur has been sewn, all has been glued down. The final step is to give everything a good brushing and do any final light trim or clean up work. Once completed, install your electronics back into the helmet and slap on that visor.
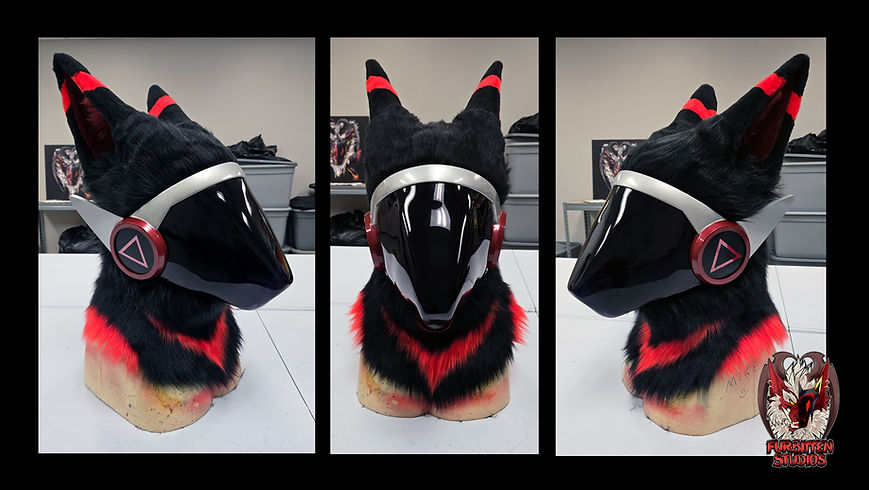
Section 6
Completed
You my friend have a complete protogen head!